Clinicals are the stepping stone into your desired medical field, and they are your practical internship where you can apply what you’ve learned in class. You cannot work in your field without your clinicals. You also cannot graduate from your program and earn your credentials.
Clinical sites require immunizations, a drug test, and a background check that all must be verified before starting your clinicals. Some of those immunizations require multiple doses. It can also take anywhere from a week and sometimes up to three months for you to complete the sequence and have your records verified. That’s a lot to keep track of, and that's why we use MyRecordTracker®.
The software allows you to upload proof of all of these requirements. The following video tutorials will walk you through the creation of your MyRecordTracker® account and how to upload the proper records.
The following video tutorials will walk you through the creation of your MyRecordTracker® account and how to upload the proper records.
Your instructor will send you an invitation to set up an account through myRecordTracker®. You will receive an email, from myRecordTracker®, with a link to set up your account.
After clicking the email link, you will be taken to the myRecordTracker® Sign up screen. There you will be prompted to set up a username, password and 4 digit PIN number.
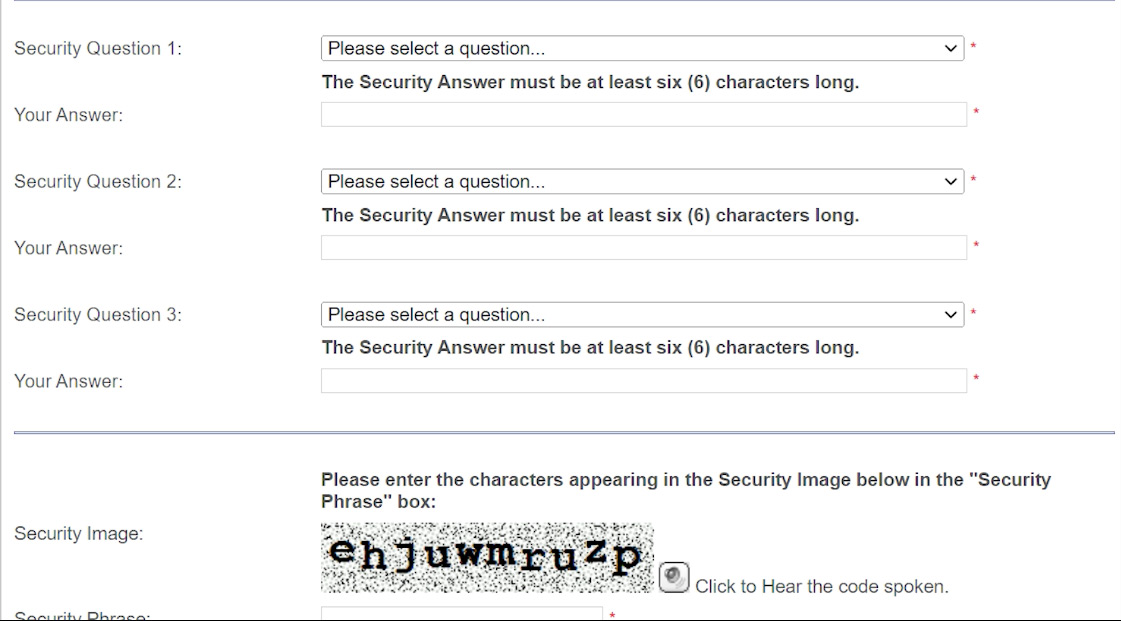
After setting your username, password, and PIN number, the next screen will prompt you to create 3 security questions. You will be asked any one of these security questions every time you go through the Login process.
Once you have successfully logged into the myRecordTracker® system, you will be directed to the homepage. The homepage has three main sections.. the ‘Profile’ section, ‘Complete My Requirements’ & ‘Distribute My Profile’.
Under the profile section, you will find the required documents you need to download, print, complete, and upload. The documents are:
All these must be printed, completed and signed by your health provider, and then uploaded into myRecordTracker®.
In order to obtain the correct forms to upload to myRecordTracker®, you will first need to download the Vaccination form provided in the Profile Section. Print this form out and take it to your medical provider. Your provider can fill out and sign the Vaccination form directly, or they may give you copies of your completed vaccination paperwork that can be scanned and uploaded to myRecordTracker®. If they fill out the printed Vaccination form directly, the only applicable sections are the ones the provider signed. For example, if your provider fills out and signs the Measles section, the form will only satisfy the measles requirement.
The Complete My Requirements section is where you will upload your vaccinations and keep track of their status. The names of the required vaccinations are listed under the Organization Requirements.
In the Member Input section, there is an attach button. Once you have uploaded the documents, clicking the attach button will allow you to see a list of the documents you have uploaded. You will then select the document that is associated with the specific Organization Requirement and be sure to name the document so it can be easily matched with the requirement. All requirements must be completed by the required date indicated at the top of the Complete My Requirements sections.
Under a brief description in the Complete My Requirements section is an upload button. This is where you will upload your completed documents in order to check off your Organization requirements.
There are two steps to uploading your document. The first is uploading the document itself. Then you associate or attach that document to the requirement it corresponds to. You can do that as you are uploading the document or as a separate step.
The first method in uploading your document is to choose the form you are wanting to add under Choose File…. After you select your form, click submit and you will be taken to the Save Document section. Give your document a name that will help you know what it is when you attach it to a requirement. Then, attach it to a requirement, add an expiration date if applicable, and click save. If your document can satisfy more than one requirement, attach that document to all appropriate requirements. After all that is completed, you will be taken back to your Profile Homepage.
The second method in uploading and attaching your documents is to go to Upload, choose a file to add, submit and be taken back to the Save Document section. Instead of choosing a requirement to attach the form to, go ahead and click save and be taken back to the Profile Homepage. Your uploaded document is now in a documents folder and needs to be associated with a requirement. Go to the Complete my Requirements section, find the organization requirement you are wanting to add a form to, and click on the Attach button in the Member Input. You will be taken to an Attach Document section where you can add an expiration date if applicable and select your already uploaded form from the Current Available Documents list. Hit save when finished and you will be taken back to your Profile Homepage and be able to view your document's status in the Complete my Requirements section. You will choose this method if the same document satisfies more than one requirement since you will need to attach it more than once.
If you need to remove an attached document from a requirement, go back to your Organization Requirments, and in the Member Input section, click unassign and it will remove your previously attached form.
Next to the Member Input, is where you can view the Status of your documentation. You will notice red dots in the Status section which indicate that your uploaded document has not been attached OR was rejected. If your document is rejected, contact your instructor immediately. If there is a yellow dot in the Status section, that means your document is pending approval. If there is a green dot, that means your document has been verified and has met the Organizational Requirement. Your goal is to have green dots for all the requirements. This must be completed by the Complete my Requirement due date in order for you to be placed at a clinic for your internship. It is your responsibility to keep up with your statuses to ensure your documentation is in order.
Remember, it can take up to 3 months for a record to be returned and confirmed. To make sure you are complete by the due date, start as early as you can.
Some sites and companies might need to have access to your myRecord Tracker®. In order to allow this access you will need to click on the deliver button in the Distribute My Profile section. If you have any questions about who and when to allow access, please ask your instructor.
© 2022 Nashville State Community College. Designed by the Students of the Visual Communications Multimedia Program